
I have dealt with a problem where my Amazon Fire TV plays choppy video and audio many times. The cause of this problem can differ depending on how and what you use on the device. I decided to use my experience to create this guide to troubleshoot this issue. Hopefully it helps you.
Video is Slow and Choppy in All Apps
Soft Reset
If you are experiencing problems with the video no matter what app you are using, a simple reset might be the trick.
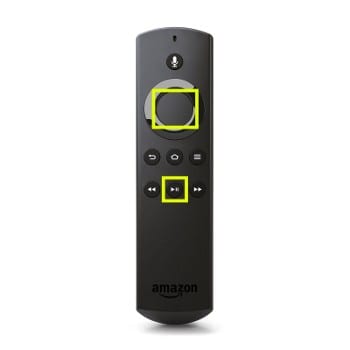
Try resetting the device by pressing and holding the “Select” ⏺ and “Play/Pause” ⏯ buttons simultaneously until the Fire TV resets.
You can also do the same thing under “Settings” > “My Fire TV” or “System” or “Device & Software” > “Reset“.
If that doesn’t fix the problem with laggy video, unplug the Fire TV then plug it back in after 10 seconds. If you have a TV that has Fire TV built in, unplug the TV for 10 seconds, then plug it back in.
If even after all of this you have problems, you might want to factory reset Fire TV. To do so, go to “Settings” > “System” > “Reset to Factory Defaults“. From there, enter your PIN, then choose “Reset“.
Clear Storage Space
The Fire TV utilizes internal storage to buffer video. If the device becomes low on storage space, performance will be degraded.
Uninstall apps from your Fire TV, or connect a USB storage device to it and move some apps over to it.
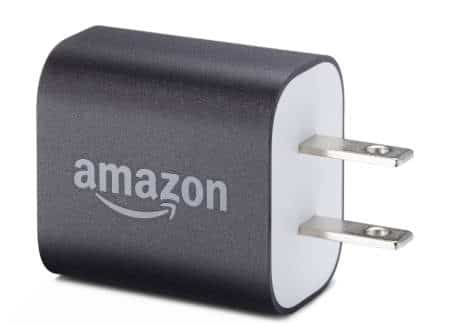
Use Wall Outlet Power Adapter
If you are using a USB port on the TV to power your Fire TV, it is likely not getting the proper voltage. Improper voltage can cause the processor in the Fire TV to underperform.
Ensure you have your Fire TV/Firestick plugged into a wall outlet using a 5 watt power block.
Ensure Strong Network Connection
Ensure that you have a strong connection to your network and the Internet. You can check your connecting by going to “Settings“⚙ > “Network“. From there select the network you are using, then press ⏯ to view Wi-Fi signal strength.
If your Fire TV is connected to a Wi-Fi network, ensure you are connected to a 5Ghz Wi-Fi network. 2.4Ghz networks can have a lot of interference from neighbor’s Wi-Fi networks as well as microwave ovens, baby monitors, wireless speakers, and surveillance systems. 5Ghz wireless networks have more resources available and provide a more reliable connection.
If you do not have an option for a 5Ghz wireless network, it’s time to invest in a dual band wireless router that supports 5Ghz.
You can also check how strong your Internet connection is on the Amazon website using these steps:
- Sign into your Amazon account using a web browser.
- Go to the “All Devices” page on Amazon. You can get there by selecting Account & Lists > Content & Devices > Devices > Fire TV.
- Select the Fire TV device you are using.
- Under “Device Health“, your connection will be listed.

Use Google DNS
Some Fire TV users have improved their connection by using Google DNS instead of the DNS settings provided by their Internet service provider. To switch your Fire TV to Google DNS, follow these steps:
If you don’t know what the IP address is to your Fire TV, go to “Settings” ⚙ > “My Fire TV” > “System” or “Device” > “About” > “Network“. Take a picture or write down the information displayed on the left pane. You will need this information later.
Now we can set the DNS.
- Starting at the Home screen, select “Settings” ⚙️.
- Open “Network“.
- Highlight the network you’re connected to, then press “Menu” ☰ then “Select” ● to forget the network. Don’t worry, we can re-add it.
- Select “Join Other Network“.
- Type the SSID (network name) to the network you wish to connect to, then select “Next“.
- Select the type of security used with network you are connecting with then select “Next“.
- If required, type the password to the network.
- Select “Advanced“.
- Manually type the static IP Address you wish to use, then select “Next“. This can be the same as the one you were using.
- Type the address for the Gateway for the network, then select “Next“.
- Type the Network Prefix Length, then select “Next“. This is set to 24 if your subnet mask is 255.255.255.0. If your subnet mask is different, you will have to determine your Network Prefix Length. You can use this chart here.
- Type 8.8.8.8 for the first DNS server, then select “Next“.
- Type 8.8.4.4 for the second DNS server, then select “Next“.
- Review the information. If it looks good, select “Connect“. If not, select “Previous” to get to the screen to make the correction.
If you need screenshots on this process, I have steps with screenshots in the post FireTV: Manually Set IP Address & DNS.
If you know your way around your networking equipment, you can also change the DNS settings on your router so that all devices on your network use Google DNS. Here are the settings:
- IPv4: 8.8.8.8 and/or 8.8.4.4.
- IPv6: 2001:4860:4860::8888 and/or 2001:4860:4860::8844.
Use an Ethernet Adapter
If you’re wireless connection just isn’t giving you the performance you need, you may need to decide to use a hard-wired network connection with your Fire TV. You can purchase an ethernet adapter for your Fire TV and connect it via a network cable. Sure, you may have to hire an electrician to run an ethernet cable through your house, but believe me, it is well worth it for the performance!
Video is Slow and Choppy in One App
If you’re only experiencing video problems in one app, try resetting the device by pressing and holding the “Select” and “Play” buttons simultaneously until the Fire TV resets.
If that doesn’t do the trick, try clearing out the app data using these steps:
- Go to “Settings” > “Applications” > “Manage Installed Applications“.
- Select the problematic app.
- Select “Force stop“.
- Select both “Clear data” and “Clear cache“.
- Now try the app again and see if things improve. If they don’t, you can select “Uninstall” from this same screen, then reinstall the app to see if that solves the issue.
If things still don’t improve with that app, it may be a poorly written app. Some apps receive less attention than others. In that case, the only thing to do is to contact the maker of the app for suggestions.
I hope this guide has helped you figure out why your Amazon Fire TV is playing video slow or choppy. If you still need help, drop a message in the comments section.
Extremely helpful! Even though I tried resetting everything my problem wasn’t resolved. The first suggestion of resetting the fire stick, worked. I had never done that before. Didn’t even know you could. Very valuable website!
what if video is only choppy on stuff played from a USB or DVD player?
There should be some picture settings. Check for upscaling.
Same issue here! 😞 Fire TV Stick 4K stopped streaming smooth videos a week ago. I’ve tried restarting the device and even reinstalling the app, but nothing seems to work. Any ideas on how to fix this? 🤔